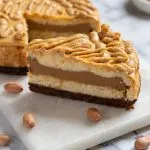
Oh, let me tell you about the indulgent delight that is Biscoff Cheesecake! Picture a smooth and creamy cheesecake filled with the irresistible flavors of Lotus Biscoff cookies. The crumbly and perfectly spiced Biscoff cookie crust adds an extra layer of deliciousness to this already heavenly dessert.

With each bite, you’ll savor the rich and velvety texture of the cheesecake, complemented by the distinct caramel and cinnamon notes of the Biscoff cookies. It’s a treat that will please any cheesecake lover, leaving them wanting more.
Ingredients Needed for This Recipe
Creating the Crust:
- 250 grams Biscoff cookies 1 package of biscoff cookies
- 1/3 cup unsalted butter 75 grams
Biscoff Cheesecake Batter:
- 1/4 cup granulated sugar 50 grams
- 4 large eggs room temp
- 907 grams cream cheese softened (4 packages of 8 oz.)
- 1/2 cup sour cream 120 grams
- 1 cup biscoff cookie butter 240 grams
- 1 tbsp vanilla extract
- 1 cup brown sugar 200 grams
- 1/4 tsp salt
To decorate:
- 1/4 cup biscoff cookies crumbled
- 1/2 cup biscoff spread
Step by step instructions for making Biscoff Cheesecake
Here’s how you make the crust:
- Pre-heat the oven to 325ºF.
- Put the biscoff cookies into a food processor and blend until they become small, powdery pieces.
- Combine the melted butter with the biscoff crumbs.
- Place the mixture firmly onto the base of an 8-inch or 9-inch cheesecake pan. It is essential to use a deep pan if using the 8-inch size.
- Place the crust in the oven and cook it for a duration of 10 minutes.
- Take it out of the oven and allow it to cool.
Biscoff Cheesecake Batter:
- Using a mixer at medium speed, beat the cream cheese for a duration of 3 minutes until it becomes creamy.
- Mix the brown sugar and granulated sugar into the cream cheese and continue to beat for an additional 2 minutes on medium speed.
- Remove any remaining food from the bowl and continue to mix for an additional 30 seconds.
- Incorporate the sour cream and biscoff cookie butter into the bowl and blend together. Ensure to scrape the sides of the bowl to include all ingredients.
- Add the vanilla, salt, and mix.
- During the mixing process, be sure to scrape the bowl a few times to prevent the cream cheese from clumping in the batter.
- You should put the eggs into the batter and mix until they are just combined. It is recommended to add one egg at a time and wait for each egg to be fully mixed in before adding the next one.
- To prevent the cheesecake from cracking, be careful not to mix too much after adding the eggs.
- Transfer the cheesecake mixture onto the prepared crust in the pan. To ensure it doesn’t stick, it might be necessary to grease the sides of the pan beforehand, which is the case with some cheesecake pans including mine. Therefore, I always apply a thin layer of oil on the sides of my pan before pouring in the cheesecake batter.
- Cover the lower part of the pan using multiple sheets of aluminum foil.
- To prevent the cheesecake from cracking, place the pan in a bigger roasting pan and fill the latter with hot water to create a water bath.
- Place the cheesecake in the oven that has been preheated to 325°F and let it bake for a duration of 60 to 70 minutes.
- In order to determine if the cheesecake has finished baking, gently shake the pan. The center should have a slight jiggle, while the sides should be firm.
- Switch off the oven and allow the cheesecake to remain inside for a period of 60 minutes.
- Take out the cheesecake from the oven and transfer it to the refrigerator for a minimum of 6 hours.
Once chilled, you can garnish your Biscoff Cheesecake with whipped cream, crushed Biscoff cookies, or a drizzle of Biscoff spread. Trust me, every bite of this delightful dessert will be pure bliss!

Biscoff Cheesecake Toppings and Decorations
Here are a few ideas to enhance the flavor and presentation of your cheesecake:
Biscoff Spread: To stay true to the Biscoff flavor, spread a generous amount of Biscoff spread on top of your cheesecake. This creamy and flavorful spread will add an extra layer of richness to your dessert.
Crushed Biscoff Cookies: For a crunchy texture, crush some Biscoff cookies and sprinkle them over the top of your cheesecake. This not only adds a delightful crunch but also showcases the iconic Biscoff flavor.
Salted Caramel Sauce: Drizzle some salted caramel sauce over your Biscoff Cheesecake to add a sweet and salty element to your dessert. The smooth caramel and Biscoff combination is simply delectable.
Fresh Berries: Add a burst of freshness and color to your cheesecake by topping it with a variety of fresh berries such as strawberries, raspberries, or blueberries. The tanginess of the berries complements the sweet Biscoff flavor perfectly.
Decorating your Biscoff Cheesecake
When it comes to decorating your Biscoff Cheesecake, creativity is key. Here are some ideas to make your cheesecake visually appealing:
Biscoff Swirls: Use a piping bag filled with melted Biscoff spread to create beautiful swirls on top of your cheesecake. This adds an elegant touch and showcases the Biscoff flavor.
Shaved Chocolate: Decorate the edges of your cheesecake with shaved chocolate for a sophisticated look. The rich chocolate complements the Biscoff flavor and adds a touch of indulgence.
Whipped Cream: Pipe some whipped cream around the edges of your cheesecake and add a sprinkle of crushed cookies on top. This creates a visually pleasing contrast of textures and flavors.
Chocolate Ganache: Drizzle a rich chocolate ganache over your cheesecake for a decadent touch. The glossy and smooth ganache elevates the presentation and adds a luxurious touch to your dessert.
Remember, the key to a beautifully decorated Biscoff Cheesecake is to have fun and let your creativity flow. Don’t be afraid to experiment with different toppings and decorations to create a dessert that not only tastes amazing but also looks stunning.
Tips and Tricks for Baking the Perfect Biscoff Cheesecake
To ensure that your cheesecake turns out perfectly creamy and delicious, here are some tips and tricks to keep in mind.
Proper Techniques for Baking Biscoff Cheesecake
- Use the Right Ingredients: To achieve the authentic Biscoff flavor, make sure to use Biscoff cookies for the crust and Biscoff spread in the cheesecake filling. This will give your cheesecake that signature sweet and caramel-like taste.
- Prepare the Crust Properly: For the crust, crush the Biscoff cookies into fine crumbs and mix them with melted butter. Press the mixture firmly into the bottom of the springform pan to create an even layer. This will ensure a sturdy base for your cheesecake.
- Optimal Mixing: When making the cheesecake filling, use an electric mixer on a low speed to combine the cream cheese, sugar, eggs, and Biscoff spread. Overmixing can lead to a dense and heavy texture, so it’s important to mix until just combined.
- Baking Time and Temperature: Bake the cheesecake at a low temperature for a longer duration to achieve a creamy and smooth texture. This will help prevent cracks on the surface. It’s advisable to use a water bath by placing the springform pan in a larger pan filled with hot water to create a moist baking environment.
Common Mistakes to Avoid When Making Biscoff Cheesecake
- Overbaking: Keep a close eye on your cheesecake while it’s in the oven. Overbaking can result in a dry and crumbly texture. The cheesecake is ready when the edges are set, and the center still has a slight jiggle.
- Skipping the Cooling Process: After baking, let the cheesecake cool in the oven for about an hour. Then, transfer it to a wire rack to cool completely at room temperature before refrigerating. This gradual cooling process helps prevent the cheesecake from cracking.
- Not Chilling Long Enough: To achieve the perfect consistency, refrigerate the cheesecake for at least 4 hours or preferably overnight. This allows the flavors to fully develop and the cheesecake to set properly.
- Rushing the Cutting Process: When it’s time to cut and serve the cheesecake, make sure to use a sharp knife. Dip the knife in warm water and wipe it clean between each slice for clean and smooth cuts.
With these tips in mind, you’ll be well-equipped to bake the perfect Biscoff cheesecake. Enjoy every delicious bite of this decadent dessert
Biscoff Cheesecake Variations
Different variations and flavors for Biscoff Cheesecake
While the classic Biscoff cheesecake is already a crowd-pleaser, there are several variations and flavors you can experiment with to take this dessert to the next level.
One popular variation is the Biscoff Cookie Butter Cheesecake. Instead of using crushed cookies as the crust, this variation incorporates Biscoff cookie butter into the filling, giving the cheesecake a richer and more intense Biscoff flavor. You can also swirl some cookie butter on top of the cheesecake before baking for a beautiful marbled effect.
For those who love a little bit of crunch in their cheesecake, you can add a layer of cookie crumbs between the crust and the filling. Simply mix crushed cookies with melted butter and press the mixture into the bottom of the pan before adding the cheesecake batter.
Another delicious variation is the Biscoff and caramel cheesecake. Drizzle caramel sauce on top of the cheesecake before serving to add a touch of sweetness and gooeyness that complements the Biscoff flavor perfectly.
Experimenting with different ingredients
You can try using different types of cookies for the crust, such as Oreo cookies or chocolate graham crackers, to add a unique twist to the dessert. You can also mix in other ingredients like chopped nuts, dried fruits, or even chunks of chocolate to add texture and extra flavors.
If you’re looking for a lighter version, you can use Greek yogurt or cream cheese with a lower fat content in place of traditional cream cheese. This will result in a slightly tangier and lighter cheesecake, perfect for those who are watching their calorie intake.

Serving and Storing Biscoff Cheesecake
Proper storage techniques to keep your Biscoff Cheesecake fresh
Once you’ve tried this delectable treat, you’ll want to ensure that it stays fresh and delicious for as long as possible. Here are some proper storage techniques to keep your Biscoff Cheesecake at its best:
- Refrigeration is Key: After making the Biscoff Cheesecake, allow it to cool completely before placing it in the refrigerator. The cold temperature will help preserve the freshness and texture of the cheesecake. Simply cover the cheesecake tightly with plastic wrap or an airtight container to prevent it from absorbing any odors from the fridge.
- Avoid Freezing: While it is possible to freeze cheesecake, it is not recommended for Biscoff Cheesecake. The texture may change, and the flavor may not be as enjoyable after thawing. Instead, it is best to consume the cheesecake within a few days or share it with friends and family to ensure it is enjoyed at its best.
- Individual Portions: If you have made a large cheesecake and are concerned about it staying fresh, consider cutting it into individual portions. This way, you can only retrieve the amount you need and keep the rest of the cheesecake intact and covered. This method helps maintain the freshness of the remaining portions.
- Wrap it Well: When storing leftover slices or individual portions, wrap them tightly in plastic wrap or place them in airtight containers. This will help prevent the cheesecake from drying out and absorbing any unwanted flavors.
- Chilled Serving: When serving the Biscoff Cheesecake, it is best enjoyed chilled. Remove it from the refrigerator a few minutes before serving to allow it to soften slightly and reach the perfect consistency. This will enhance the creamy texture and bring out the flavor of the Biscoff cookies.
FAQs
If you’re considering making a delicious biscoff cheesecake, you may have some questions running through your mind. Don’t worry, we’ve got you covered! Here are some frequently asked questions about biscoff cheesecake:
1. Can I use other types of cookies instead of biscoff cookies?
Absolutely! While biscoff cookies add a unique flavor and texture to the cheesecake, you can certainly experiment with other types of cookies as well. Graham crackers, Oreos, or even chocolate chip cookies can be great alternatives. Just make sure to adjust the quantities accordingly and consider the flavor combination with the cheesecake filling.
2. Can I make a no-bake version of biscoff cheesecake?
Yes, you can! Biscoff cheesecake can be made both as a baked or a no-bake dessert. The no-bake version typically uses a combination of whipped cream, cream cheese, and biscoff spread or cookie crumbs as the base. It’s a quick and easy option if you don’t want to turn on the oven.
3. Can I freeze biscoff cheesecake?
Absolutely! Biscoff cheesecake freezes very well, making it a convenient choice for make-ahead desserts. Just make sure to wrap it tightly in plastic wrap or place it in an airtight container before freezing. Allow it to thaw in the refrigerator overnight before serving.
4. Can I substitute cream cheese with a healthier alternative?
While traditional biscoff cheesecake recipes call for cream cheese, you can definitely experiment with healthier alternatives. Greek yogurt, cottage cheese, or even cashew cream can be used as substitutes. Keep in mind that the texture and taste may vary slightly, so it’s best to try small batches until you find the perfect substitute.
5. How long does biscoff cheesecake stay fresh?
Biscoff cheesecake, when stored properly in the refrigerator, can stay fresh for around 3-4 days. However, it’s best to consume it within the first couple of days for optimal taste and texture.
More Cheesecake Desserts
If you’re looking for delicious cake recipes, here are some other cheesecakes you might like:
- Birthday Cake Cheesecake
- Peanut Butter Cookie Sandwich Cheesecake
- White Chocolate Mousse Cranberry Cheesecake

Biscoff Cheesecake
INGREDIENTS
Creating the Crust:
- 250 grams Biscoff cookies 1 package of biscoff cookies
- 1/3 cup unsalted butter 75 grams
Biscoff Cheesecake Batter:
- 1/4 cup granulated sugar 50 grams
- 4 large eggs room temp
- 907 grams cream cheese softened 4 packages of 8 oz.
- 1/2 cup sour cream 120 grams
- 1 cup biscoff cookie butter 240 grams
- 1 tbsp vanilla extract
- 1 cup brown sugar 200 grams
- 1/4 tsp salt
To decorate:
- 1/4 cup biscoff cookies crumbled
- 1/2 cup biscoff spread
INSTRUCTIONS
Here’s how you make the crust:
- Pre-heat the oven to 325ºF.
- Put the biscoff cookies into a food processor and blend until they become small, powdery pieces.
- Combine the melted butter with the biscoff crumbs.
- Place the mixture firmly onto the base of an 8-inch or 9-inch cheesecake pan. It is essential to use a deep pan if using the 8-inch size.
- Place the crust in the oven and cook it for a duration of 10 minutes.
- Take it out of the oven and allow it to cool.
Biscoff Cheesecake Batter:
- Using a mixer at medium speed, beat the cream cheese for a duration of 3 minutes until it becomes creamy.
- Mix the brown sugar and granulated sugar into the cream cheese and continue to beat for an additional 2 minutes on medium speed.
- Remove any remaining food from the bowl and continue to mix for an additional 30 seconds.
- Incorporate the sour cream and biscoff cookie butter into the bowl and blend together. Ensure to scrape the sides of the bowl to include all ingredients.
- Add the vanilla, salt, and mix.
- During the mixing process, be sure to scrape the bowl a few times to prevent the cream cheese from clumping in the batter.
- You should put the eggs into the batter and mix until they are just combined. It is recommended to add one egg at a time and wait for each egg to be fully mixed in before adding the next one.
- To prevent the cheesecake from cracking, be careful not to mix too much after adding the eggs.
- Transfer the cheesecake mixture onto the prepared crust in the pan. To ensure it doesn’t stick, it might be necessary to grease the sides of the pan beforehand, which is the case with some cheesecake pans including mine. Therefore, I always apply a thin layer of oil on the sides of my pan before pouring in the cheesecake batter.
- Cover the lower part of the pan using multiple sheets of aluminum foil.
- To prevent the cheesecake from cracking, place the pan in a bigger roasting pan and fill the latter with hot water to create a water bath.
- Place the cheesecake in the oven that has been preheated to 325°F and let it bake for a duration of 60 to 70 minutes.
- In order to determine if the cheesecake has finished baking, gently shake the pan. The center should have a slight jiggle, while the sides should be firm.
- Switch off the oven and allow the cheesecake to remain inside for a period of 60 minutes.
- Take out the cheesecake from the oven and transfer it to the refrigerator for a minimum of 6 hours.


