
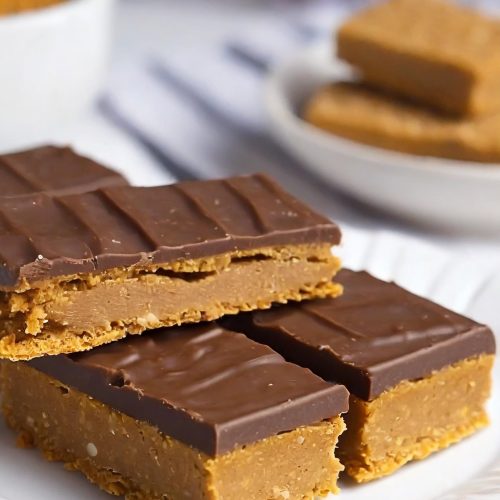
These Lunch Lady Peanut Butter Bars bars are a delicious blend of sweet and savory flavors that will satisfy any peanut butter lover’s cravings. The recipe is incredibly easy to follow and requires simple ingredients that are likely already in your pantry. With a buttery graham cracker crust as the base and a creamy peanut butter filling, these bars are the perfect treat for any occasion.
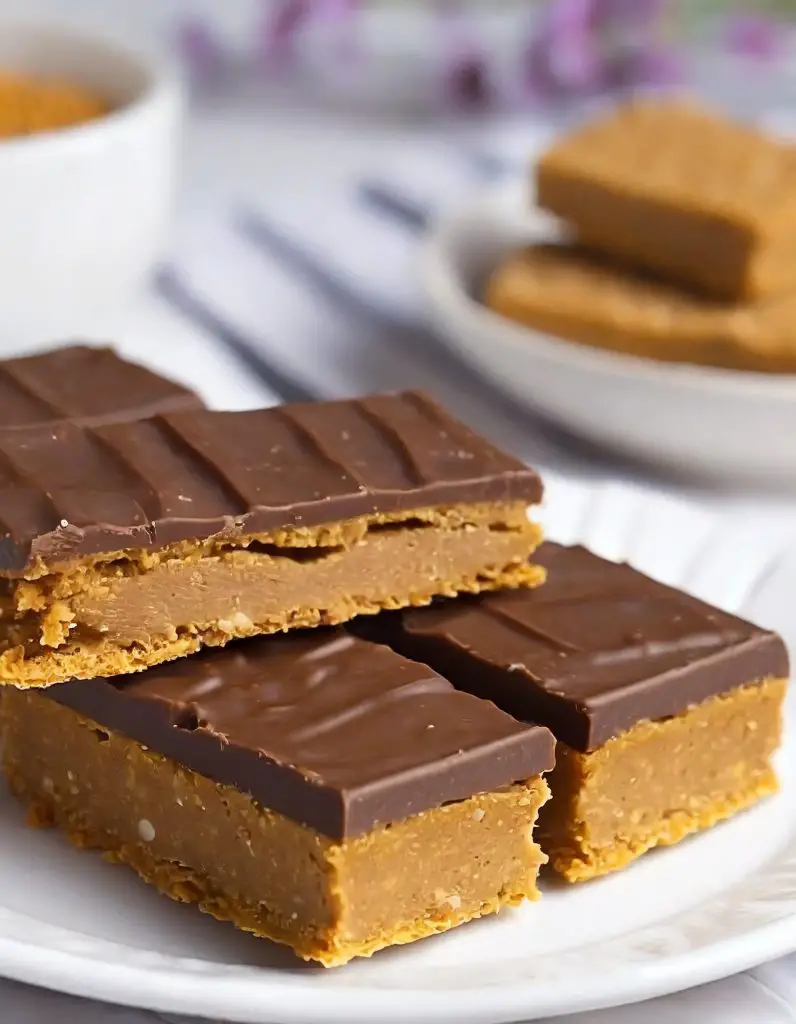
Whether you’re packing them for lunch or enjoying them as an afternoon snack, these Lunch Lady Peanut Butter Bars are sure to be a hit with the whole family.
Ingredients Needed for This Recipe
Bars
- 1 cup salted butter, softened (227g)
- 1 cup granulated sugar (200g)
- 1 cup packed light brown sugar (200g)
- 2 ½ cups creamy peanut butter, divided
- 2 large eggs
- 2 teaspoons vanilla extract
- 2 cups all-purpose flour, scooped & leveled (282g)
- 2 cups old-fashioned oats
- 1 teaspoon baking soda
- 1 teaspoon salt
Frosting
- ½ cup salted butter, softened (227g)
- 3 cups powdered sugar
- 4 Tablespoons cocoa powder
- ¼ cup milk
- 2 teaspoons vanilla extract
Instructions for Making Lunch Lady Peanut Butter Bars
- Preheat oven to 350°F. Spray a half-sheet baking sheet (13″x18″) with baking spray.
- Beat the butter, granulated sugar, brown sugar, and 1 cup of the peanut butter in a mixer until creamy and light. Add eggs and vanilla extract, then beat again, scraping the bottom and sides of the bowl.
- Add the flour, oats, baking soda, and salt. Mix just until combined. Spread the peanut butter oatmeal cookie dough into the prepared pan with a spatula. Bake for 15-17 minutes until golden brown around the edges and barely set in the middle. Do not overbake.
- While the peanut butter oatmeal cookie base is still hot, melt the remaining 1 ½ cups of peanut butter in the microwave in a microwave-safe bowl for 1 minute, then drizzle over the top of the bars, spreading it into an even layer with a spatula or knife. Let cool completely until the peanut butter has firmed up. This can be sped up by sticking the bars in the fridge.
- Make the chocolate frosting by beating the butter, powdered sugar, cocoa powder, milk, and vanilla extract in a large bowl until smooth. Spread in an even layer over the cooled bars, then cut into squares.
Storage and Variations
Storage: Keep your bars covered in an airtight container on the counter for 5-7 days. They can also be kept in the fridge and served chilled.
Freezing: These bars freeze well for 2-3 months. Slice and separate the bars, then freeze them individually for an hour to set the frosting before transferring them to a freezer-safe container.
Variation: For extra peanut butter chocolate action, try chopping up some Reese’s peanut butter cups to sprinkle on top, or use Reese’s Pieces or chopped dry roasted peanuts.
Gluten-Free and Allergy-Friendly Options
Gluten-Free: Use a 1-to-1 gluten-free baking flour replacement and ensure your oats are gluten-free.
Allergy-Friendly: If you have a peanut butter allergy, you can use cookie butter, almond butter, or sunflower seed butter instead.
Tips for Perfecting Lunch Lady Peanut Butter Bars
Butter Temperature: Use softened butter for both the base and frosting. This ensures a smooth, easily spreadable consistency.
Quality of Ingredients: Opt for high-quality peanut butter for a richer flavor. Natural peanut butters can separate and affect the texture.
Oven Calibration: Ensure your oven is correctly calibrated. Overbaking can lead to dry bars, while underbaking might make them too gooey.
Even Spreading: When spreading the dough in the baking sheet, aim for an even layer to ensure uniform baking and texture.
Cooling Time: Allow the bars to cool completely before adding the frosting. This prevents the frosting from melting and ensures a neat layer.
Cutting Bars: For clean cuts, use a sharp knife and clean it between cuts. If the bars are chilled, let them sit at room temperature for a few minutes before cutting.
Ingredient Substitutions: Be mindful of substitutions. Changing the type of sugar or flour can alter the texture and taste significantly.
Frosting Consistency: If the frosting is too thick, add a little more milk to reach the desired consistency. If it’s too thin, add more powdered sugar.
Experiment with Toppings: Feel free to add toppings like chopped nuts, chocolate chips, or a drizzle of caramel for extra flavor and texture.
Storage: Store in an airtight container to keep them fresh. If in a humid environment, refrigerating them can prevent stickiness.
Frequently Asked Questions (FAQs)
Q: Can I make these bars gluten-free? A: Yes, you can use a 1-to-1 gluten-free flour blend instead of all-purpose flour. Ensure that the oats are certified gluten-free.
Q: How can I make these bars nut-free? A: For a nut-free version, substitute the peanut butter with sunflower seed butter or soy butter. Ensure other ingredients are nut-free as well.
Q: Can I freeze these peanut butter bars? A: Absolutely! Freeze them in an airtight container for up to 3 months. Thaw at room temperature before serving.
Q: Can I reduce the sugar in this recipe? A: Reducing sugar might affect the texture and taste. For a less sweet option, you can slightly reduce the amount, but be cautious as it can alter the final product.
Q: What can I use instead of old-fashioned oats? A: Quick oats can be used, but they will give a less chewy texture. Avoid using steel-cut oats as they won’t soften properly.
Q: Can I add chocolate chips to the batter? A: Yes, you can add chocolate chips to the batter for extra chocolatey goodness. Mix them in with the dry ingredients.
Q: How do I know when the bars are done baking? A: The edges should be lightly golden, and the center should be set but not fully firm as it will continue to cook slightly while cooling.
Q: Can I make these bars vegan? A: To make them vegan, use plant-based butter, a suitable egg substitute, and ensure that the peanut butter and chocolate are vegan-friendly.
Q: How long do these bars stay fresh? A: Stored in an airtight container at room temperature, they stay fresh for up to a week. In the refrigerator, they can last a bit longer.
Q: Can I use crunchy peanut butter instead of creamy? A: Yes, crunchy peanut butter can be used for added texture. The overall taste will remain similar.
Lunch Lady Peanut Butter Bars
INGREDIENTS
Bars
- 1 cup salted butter softened (227g)
- 1 cup granulated sugar 200g
- 1 cup packed light brown sugar 200g
- 2 ½ cups creamy peanut butter divided
- 2 large eggs
- 2 teaspoons vanilla extract
- 2 cups all-purpose flour scooped & leveled (282g)
- 2 cups old-fashioned oats
- 1 teaspoon baking soda
- 1 teaspoon salt
Frosting
- ½ cup salted butter softened (227g)
- 3 cups powdered sugar
- 4 Tablespoons cocoa powder
- ¼ cup milk
- 2 teaspoons vanilla extract
INSTRUCTIONS
- Preheat oven to 350°F. Spray a half-sheet baking sheet (13″x18″) with baking spray.
- Beat the butter, granulated sugar, brown sugar, and 1 cup of the peanut butter in a mixer until creamy and light. Add eggs and vanilla extract, then beat again, scraping the bottom and sides of the bowl.
- Add the flour, oats, baking soda, and salt. Mix just until combined. Spread the peanut butter oatmeal cookie dough into the prepared pan with a spatula. Bake for 15-17 minutes until golden brown around the edges and barely set in the middle. Do not overbake.
- While the peanut butter oatmeal cookie base is still hot, melt the remaining 1 ½ cups of peanut butter in the microwave in a microwave-safe bowl for 1 minute, then drizzle over the top of the bars, spreading it into an even layer with a spatula or knife. Let cool completely until the peanut butter has firmed up. This can be sped up by sticking the bars in the fridge.
- Make the chocolate frosting by beating the butter, powdered sugar, cocoa powder, milk, and vanilla extract in a large bowl until smooth. Spread in an even layer over the cooled bars, then cut into squares.


