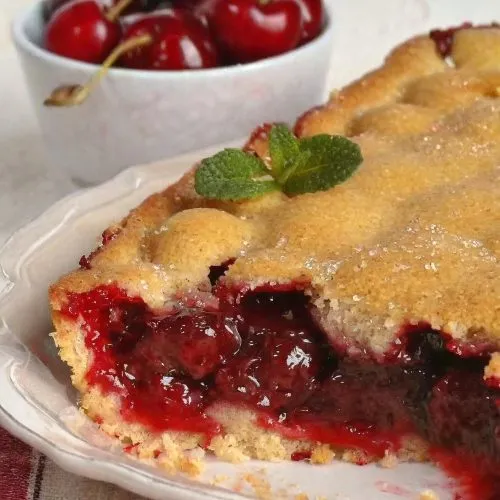
There’s nothing quite like a warm, homemade cherry cobbler with a dollop of creamy vanilla ice cream on top. If you’re looking to whip up this classic dessert for yourself or to impress your friends and family, look no further! Here’s a simple guide to help you make a mouthwatering cherry cobbler right in your own kitchen.

Ingredients Needed for This Recipe
- 6 tablespoons unsalted butter
- 1 cup all-purpose flour
- 2/3 cup granulated sugar
- 1 ½ teaspoons baking powder
- ¼ teaspoon salt
- 1 teaspoon cinnamon
- 1 cup milk
- 1 teaspoon vanilla extract
- 1 (21-ounce) can premium canned cherry pie filling
Instructions for Making Cherry Cobbler
- Preheat the oven to 350 degrees. Place the butter in the bottom of a 9×9 inch or equivalent size baking dish. Put the dish into the oven to melt the butter. Once melted, remove the dish from the oven.
- Prepare the batter: In a medium bowl, whisk together the flour, sugar, baking powder, salt, and ground cinnamon. In a measuring cup, combine the milk and vanilla extract. Add the milk mixture to the flour mixture and stir to combine.
- Assemble the cobbler: Pour the flour mixture over the melted butter in the baking pan, but do not mix them together. Spoon the cherry pie filling over the flour mixture. Again, do not mix.
- Bake: Bake for 50-60 minutes or until golden brown.
- Serve: Enjoy the cobbler with fresh whipped cream or a scoop of ice cream.
Notes
- Keep an eye on the butter in the oven and remove it when it is melted.
- Using premium cherry pie filling is recommended for optimal flavor.
- The dessert can be served warm or at room temperature and is also enjoyable cold.
- Store leftovers on the counter for up to 2 days, then in an airtight container in the refrigerator for up to 3 additional days. Reheat in the microwave at reduced power.
- To freeze, cool completely, cover with 2 layers of plastic wrap, and freeze for up to 3 months. Thaw in the fridge overnight and reheat in the oven or microwave at reduced power.
Tips for Perfecting the Recipe
Butter Monitoring: Keep a close eye on the butter as it melts in the oven to avoid burning.
Quality of Ingredients: Use premium cherry pie filling for a richer flavor. If you have time, consider making homemade cherry pie filling.
Baking Dish: The recipe can also be prepared in a 10 or 11-inch cast iron skillet for a rustic presentation and even baking.
Oven Temperature: Ensure your oven is correctly calibrated for accurate baking.
Mixing: When combining the flour mixture with the milk and vanilla extract, mix just until combined to avoid overworking the batter.
Layering: Do not mix the flour mixture with the melted butter or the cherry pie filling when layering in the baking dish. This helps create distinct layers in the cobbler.
Serving: The cobbler can be served warm, at room temperature, or even cold, based on preference. It pairs wonderfully with homemade whipped cream or vanilla ice cream.
Frequently Asked Questions
Can I use fresh or frozen cherries instead of canned cherry pie filling?
Yes, you can use fresh or frozen cherries. For fresh cherries, pit them and cook in a syrup thickened with cornstarch. For frozen cherries, add an extra tablespoon of cornstarch due to the additional moisture.
How can I store and reheat the cobbler?
Store leftovers on the counter for up to 2 days, then in the refrigerator for up to 3 additional days in an airtight container. Reheat in the microwave at reduced power. For freezing, cool completely, cover with plastic wrap, and freeze for up to 3 months. Thaw in the fridge overnight and reheat in the oven or microwave.
Can I make this cobbler with other fruits?
Absolutely! You can swap the cherry pie filling for apple, peach, blueberry, or strawberry fillings. You can also make your own pie filling using fresh fruit in a simple syrup thickened with cornstarch.
Is it possible to make this recipe gluten-free?
To make a gluten-free version, substitute the all-purpose flour with a gluten-free flour blend. Ensure that the baking powder and other ingredients are gluten-free as well.
What if my cobbler isn’t browning on top?
If the cobbler isn’t browning as expected, you can place it under the broiler for a minute or two at the end of baking. Watch it closely to prevent burning.

Cherry Cobbler Recipe
INGREDIENTS
- 6 tablespoons unsalted butter
- 1 cup all-purpose flour
- 2/3 cup granulated sugar
- 1 ½ teaspoons baking powder
- ¼ teaspoon salt
- 1 teaspoon cinnamon
- 1 cup milk
- 1 teaspoon vanilla extract
- 1 21-ounce can premium canned cherry pie filling
INSTRUCTIONS
- Preheat the oven to 350 degrees. Place the butter in the bottom of a 9×9 inch or equivalent size baking dish. Put the dish into the oven to melt the butter. Once melted, remove the dish from the oven.
- Prepare the batter: In a medium bowl, whisk together the flour, sugar, baking powder, salt, and ground cinnamon. In a measuring cup, combine the milk and vanilla extract. Add the milk mixture to the flour mixture and stir to combine.
- Assemble the cobbler: Pour the flour mixture over the melted butter in the baking pan, but do not mix them together. Spoon the cherry pie filling over the flour mixture. Again, do not mix.
- Bake: Bake for 50-60 minutes or until golden brown.
- Serve: Enjoy the cobbler with fresh whipped cream or a scoop of ice cream.
Notes
Using premium cherry pie filling is recommended for optimal flavor.
The dessert can be served warm or at room temperature and is also enjoyable cold.
Store leftovers on the counter for up to 2 days, then in an airtight container in the refrigerator for up to 3 additional days. Reheat in the microwave at reduced power.
To freeze, cool completely, cover with 2 layers of plastic wrap, and freeze for up to 3 months. Thaw in the fridge overnight and reheat in the oven or microwave at reduced power.


