
Indulging in a rich and velvety chocolate dessert is enough to make anyone’s taste buds dance with delight. And what better way to satisfy that chocolate craving than with a homemade Chocolate Mousse Pie? This delectable dessert combines the smoothness of mousse with the flakiness of a pie crust, creating a heavenly combination that is sure to please any chocolate lover.
Ingredients for a delicious Chocolate Mousse Pie
To create the perfect Chocolate Mousse Pie, you will need the following key ingredients:
- Chocolate: Choose a high-quality dark or semisweet chocolate with at least 60% cocoa content for a rich and intense chocolate flavor. You can also mix different types of chocolate for a more complex taste.
- Eggs: Fresh eggs are essential for creating a light and airy mousse. Separate the yolks from the whites and use both parts in different steps of the recipe.
- Whipping cream: Whipping cream adds a luxurious creaminess to the mousse. Make sure to use heavy whipping cream with a high fat content for the best results.
- Sugar: Use granulated sugar to sweeten the mousse and stabilize the whipped egg whites. Adjust the amount to your preferred level of sweetness.
- Butter: A small amount of butter helps to enhance the flavor and give the mousse a silky smooth texture.
Now that you have all the key ingredients, it’s time to start creating the Chocolate Mousse Pie of your dreams. Combine the melted chocolate, egg yolks, and butter in a bowl, and whip the egg whites with sugar until they form stiff peaks. Gently fold the whipped cream into the chocolate mixture, followed by the whipped egg whites. Pour the mousse into a pre-baked pie crust and refrigerate for at least 4 hours or overnight to allow it to set.
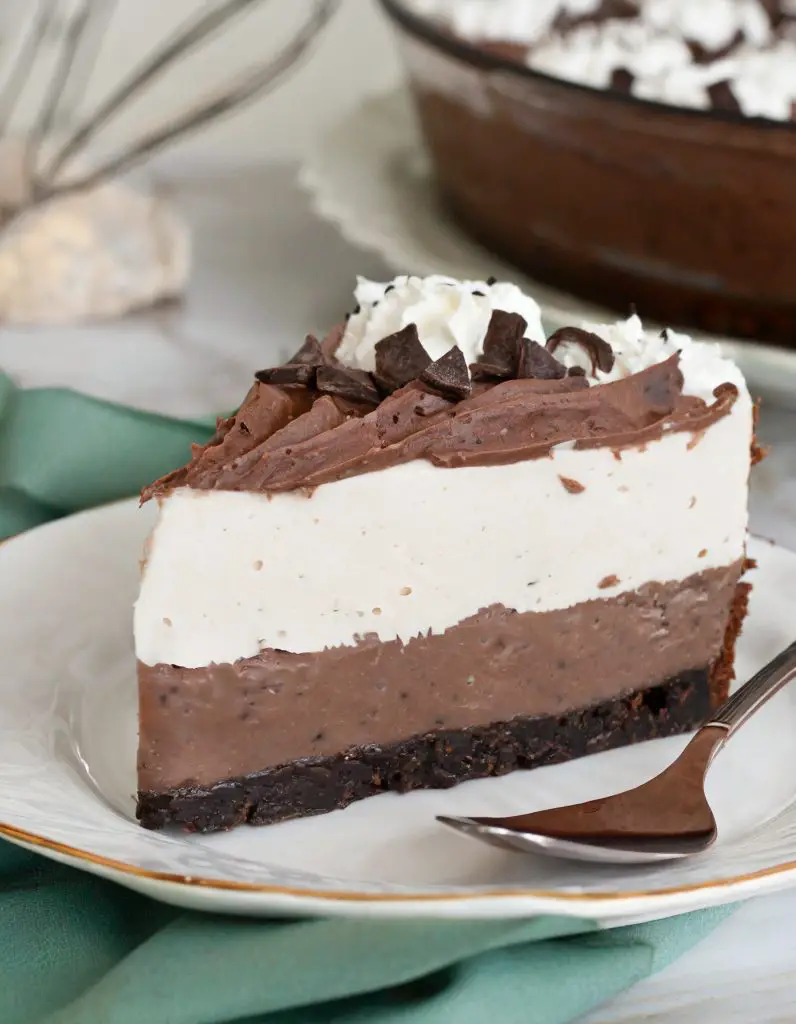
When you’re ready to serve, top the pie with some whipped cream and chocolate shavings for an elegant finishing touch. Each bite of the silky smooth mousse and flaky pie crust will transport you to chocolate heaven.
The Crust
Crust options for your Chocolate Mousse Pie
When it comes to the crust, you have a few delicious options to choose from. Each one brings a unique flavor and texture to complement the decadent mousse filling. Here are three popular crust options for your chocolate mousse pie:
- Oreo Cookie Crust: Crushed Oreo cookies mixed with melted butter create a crunchy and chocolatey base that perfectly complements the smoothness of the mousse filling.
- Graham Cracker Crust: Graham cracker crumbs combined with melted butter and a touch of sugar yield a sweet and buttery crust that adds a delightful contrast to the creamy mousse.
- Chocolate Cookie Crust: If you want an extra dose of chocolate, try using chocolate cookie crumbs for your crust. This option is perfect for the ultimate chocolate lover.
Tips for achieving a perfect crust texture and taste
To ensure your crust turns out perfectly every time, here are some tips to keep in mind:
- Pre-bake the crust: Before adding the mousse filling, it’s essential to pre-bake the crust. This helps prevent a soggy bottom and ensures a crisp texture.
- Chill the crust: After pre-baking, allow the crust to cool completely before adding the mousse filling. This helps the crust set and maintains its texture.
- Add flavor: To enhance the flavor profile of your crust, consider adding a pinch of cinnamon or a splash of vanilla extract to the mixture.
- Press firmly: When pressing the crust into the pie dish, make sure to firmly and evenly distribute the crumbs. This ensures a solid base for your mousse filling.
- Use a springform pan: If you want to make it easier to remove the pie from the dish, consider using a springform pan. The removable sides allow for a clean and effortless presentation.
So, whether you opt for an Oreo cookie crust, a graham cracker crust, or a chocolate cookie crust, be sure to follow these tips to achieve a perfect balance of texture and taste in your Chocolate Mousse Pie. Serve it chilled and garnish with whipped cream or chocolate shavings for an extra touch of elegance.

The Chocolate Mousse Pie Recipe
Let’s dive into the process of preparing the heavenly chocolate mousse filling that will make your taste buds dance with joy. To create this recipe, you will need the following ingredients:
Oreo Crust:
- 22 regular Oreos
- 5 tablespoons (71 grams) salted butter, melted
Chocolate Mousse:
- 4 egg yolks
- ¼ cup (50 grams) granulated sugar
- ¼ teaspoon salt
- 2 cups (480 mL) heavy whipping cream, divided
- ¾ teaspoon vanilla extract
- 2 4 oz semi-sweet chocolate bars, chopped
Chocolate Ganache:
- 1 cup (240 mL) heavy whipping cream
- 2 4 oz semi-sweet chocolate bars, chopped
Here’s how to make it
Oreo Crust:
- Preheat oven to 350F and line the bottom of an 8 or 9-inch springform pan with parchment paper. Set aside.
- In a food processor, pulse the Oreos until they are a fine crumb. Add the melted butter and pulse until combined.
- Pack the Oreo mixture into the bottom and up the sides of the prepared pan. Press the mixture into the pan firmly. Pre-bake the crust for 8-10 minutes until aromatic. Let it cool for 10 minutes, then place it in the freezer to cool completely.
Chocolate Mousse:
- Pour 2 cups (480 mL) of heavy whipping cream into a measuring cup. Separate ¾ cup (180 mL) and put the remaining back into the fridge.
- Chop the chocolate and set aside.
- In a medium-sized heatproof bowl, whisk together the egg yolks, granulated sugar, and salt. Place the bowl over simmering water and whisk continuously for about 4 minutes.
- Microwave the separated ¾ cup (180 mL) of heavy cream for 45 seconds. Slowly pour the warmed heavy cream into the egg mixture while whisking. Remove from heat, add vanilla extract, and stir.
- Melt the chocolate in the microwave in 30-second increments. Add the melted chocolate to the egg mixture and whisk until combined.
- Beat the remaining heavy cream until medium peaks form. Fold this into the chocolate mixture until combined.
- Pour the filling over the cold Oreo crust and refrigerate for 3 hours.
Chocolate Ganache:
- Chop the chocolate finely and set aside. Heat the heavy cream until hot, either in the microwave or on the stove.
- Pour the hot cream over the chopped chocolate and let it stand for 5 minutes. Stir until combined.
- Separate about ⅔ of the ganache and refrigerate. Pour the remaining ganache over the mousse and spread evenly. Refrigerate for 45 minutes.
- Beat the refrigerated ganache until fluffy. Using a piping bag with a star tip, pipe the ganache onto the pie. Top with chocolate sprinkles or shavings.
Adding flavors and variations to your Chocolate Mousse Pie
Now that you have the base recipe for your chocolate mousse filling, you can get creative and add some flavors and variations to make it even more delightful. Here are a few ideas to get you started:
- Mint Chocolate Mousse Pie: Add a hint of mint extract to the chocolate mousse filling for a refreshing twist. You can also garnish the pie with chocolate shavings and a sprig of fresh mint.
- Raspberry Chocolate Mousse Pie: Layer fresh raspberries on top of the chocolate mousse filling before chilling the pie. The combination of tangy raspberries and rich chocolate is simply irresistible.
- Hazelnut Chocolate Mousse Pie: Mix some chopped toasted hazelnuts into the chocolate mousse filling for a delightful crunch. You can also sprinkle some crushed hazelnuts on top for added texture.
- Peanut Butter Chocolate Mousse Pie: Swirl in some creamy peanut butter into the chocolate mousse filling for a divine flavor combination. Top the pie with a drizzle of melted peanut butter and chopped peanuts for extra indulgence.
With these flavor variations, you can create a chocolate cream or mouse pie that suits your tastebuds and impresses your guests. Experiment with different combinations and let your imagination run wild!
So, there you have it— an irresistible Chocolate Mousse Pie recipe that will satisfy your chocolate cravings. Whether you stick to the classic recipe or add your own twist, this dessert is sure to be a crowd-pleaser. Enjoy every velvety bite and savor the pure bliss of chocolatey goodness!
Decorating and Serving
Decorative ideas for a visually appealing Chocolate Mousse Pie
When it comes to desserts, presentation is key. A beautifully decorated Chocolate Mousse Pie can be the star of any dinner party or gathering. Here are some decorative ideas to make your pie visually appealing and irresistible:
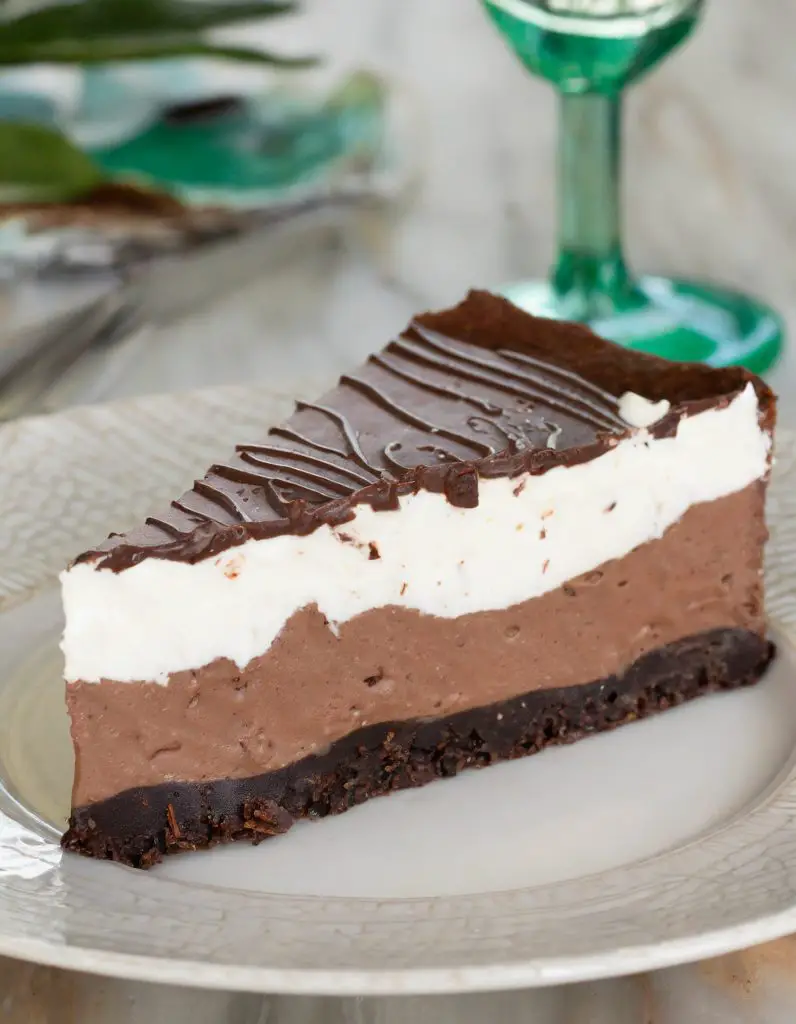
- Whipped Cream and Chocolate Shavings: Start by topping your pie with a generous dollop of homemade whipped cream. Then, finish it off with a sprinkling of chocolate shavings. This classic combination not only adds a touch of elegance but also enhances the rich chocolate flavor.
- Fresh Berries: Add a burst of color and freshness to your Chocolate Mousse Pie by garnishing it with a selection of fresh berries. Raspberries, strawberries, or blueberries make a beautiful and tasty addition.
- Mint Leaves: For a refreshing twist, garnish your pie with a few sprigs of fresh mint leaves. The vibrant green color provides a lovely contrast to the rich chocolate.
- Cocoa Powder Dusting: Lightly dust the top of your pie with cocoa powder using a fine-mesh sieve. This simple technique adds a touch of sophistication and a hint of bitterness to balance out the sweetness.
Tips for serving and storing your Chocolate Mousse Pie
Now that your Chocolate Mousse Pie is beautifully decorated, it’s time to serve and store it properly. Here are a few tips to ensure that your pie remains delicious and fresh:
- Serving: To achieve clean and neat slices, use a sharp knife that has been warmed in hot water. This will help prevent the mousse from sticking to the knife and ensure smooth cuts. Serve each slice on individual plates or dessert dishes for an elegant presentation.
- Storing: If you have any leftover pie, it’s important to store it correctly to maintain its texture and flavor. Keep the pie refrigerated in an airtight container to prevent it from drying out. It is best consumed within 2-3 days to ensure optimal taste and freshness.
- Freezing: If you want to make the pie ahead of time, you can freeze it for later use. Wrap the pie tightly in plastic wrap and place it in a freezer-safe container. It can be stored in the freezer for up to 2 months. Before serving, allow the pie to thaw in the refrigerator overnight.
- Garnishing before serving: If you choose to freeze the pie, it’s best to add the decorative toppings just before serving. This ensures that the whipped cream, berries, or mint leaves are fresh and visually appealing.
- Transporting: If you need to transport the pie to a different location, make sure to keep it flat and secure in a pie carrier or a box lined with a non-slip mat. Avoid placing heavy items on top of the pie to prevent squishing or damaging the decoration.
More Cakes Recipe
Here are some other cake recipes you might like:
- Lemon Curd Cake
- Peach Cobbler With Cake Mix Recipe
- Peach Cobbler Pound Cake
- Birthday Cake Cheesecake
- Apple Pie Filling Coffee Cake

Chocolate Mousse Pie
INGREDIENTS
Oreo Crust:
- 22 regular Oreos
- 5 tablespoons 71 grams salted butter, melted
Chocolate Mousse:
- 4 egg yolks
- ¼ cup 50 grams granulated sugar
- ¼ teaspoon salt
- 2 cups 480 mL heavy whipping cream, divided
- ¾ teaspoon vanilla extract
- 2 4 oz semi-sweet chocolate bars chopped
Chocolate Ganache:
- 1 cup 240 mL heavy whipping cream
- 2 4 oz semi-sweet chocolate bars chopped
INSTRUCTIONS
Oreo Crust:
- Preheat oven to 350F and line the bottom of an 8 or 9-inch springform pan with parchment paper. Set aside.
- In a food processor, pulse the Oreos until they are a fine crumb. Add the melted butter and pulse until combined.
- Pack the Oreo mixture into the bottom and up the sides of the prepared pan. Press the mixture into the pan firmly. Pre-bake the crust for 8-10 minutes until aromatic. Let it cool for 10 minutes, then place it in the freezer to cool completely.
Chocolate Mousse:
- Pour 2 cups (480 mL) of heavy whipping cream into a measuring cup. Separate ¾ cup (180 mL) and put the remaining back into the fridge.
- Chop the chocolate and set aside.
- In a medium-sized heatproof bowl, whisk together the egg yolks, granulated sugar, and salt. Place the bowl over simmering water and whisk continuously for about 4 minutes.
- Microwave the separated ¾ cup (180 mL) of heavy cream for 45 seconds. Slowly pour the warmed heavy cream into the egg mixture while whisking. Remove from heat, add vanilla extract, and stir.
- Melt the chocolate in the microwave in 30-second increments. Add the melted chocolate to the egg mixture and whisk until combined.
- Beat the remaining heavy cream until medium peaks form. Fold this into the chocolate mixture until combined.
- Pour the filling over the cold Oreo crust and refrigerate for 3 hours.
Chocolate Ganache:
- Chop the chocolate finely and set aside. Heat the heavy cream until hot, either in the microwave or on the stove.
- Pour the hot cream over the chopped chocolate and let it stand for 5 minutes. Stir until combined.
- Separate about ⅔ of the ganache and refrigerate. Pour the remaining ganache over the mousse and spread evenly. Refrigerate for 45 minutes.
- Beat the refrigerated ganache until fluffy. Using a piping bag with a star tip, pipe the ganache onto the pie. Top with chocolate sprinkles or shavings.


