
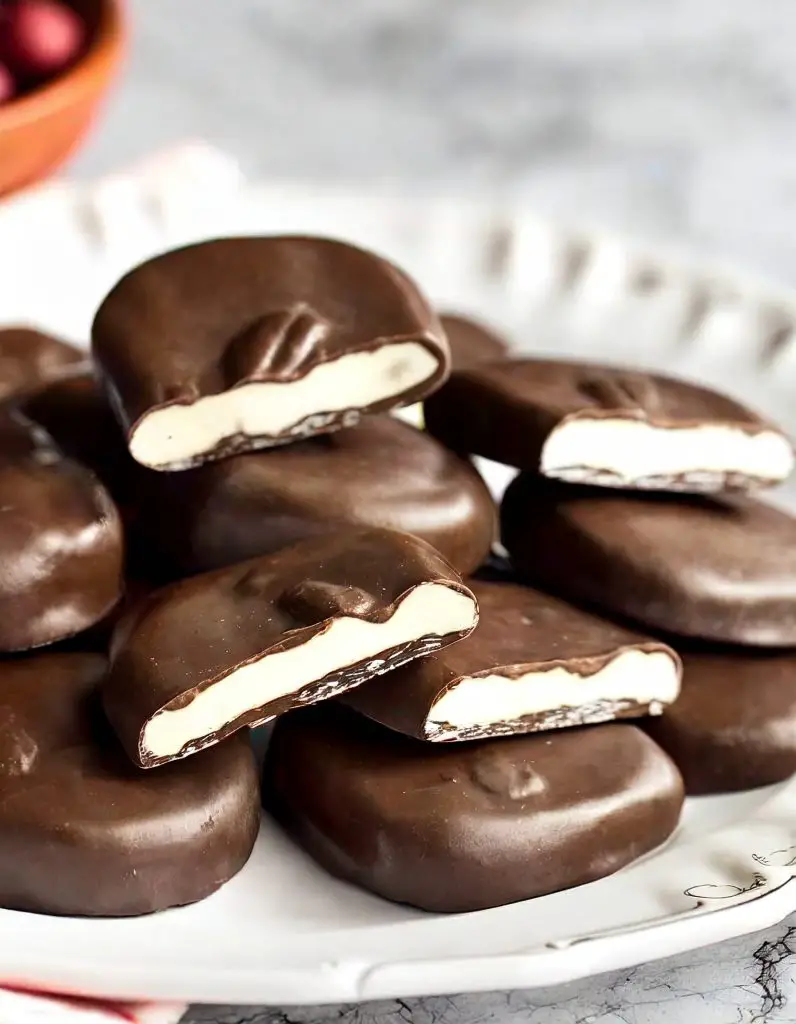
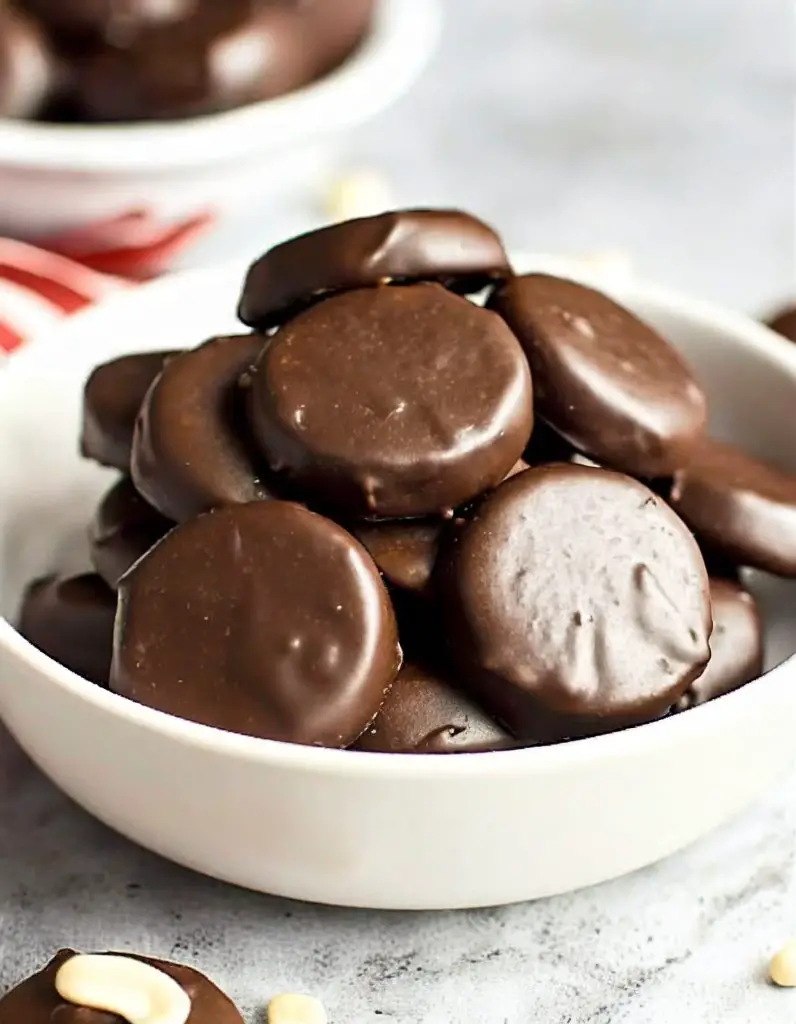
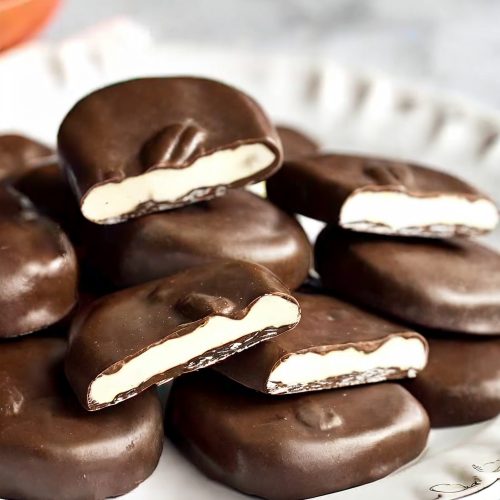
Peppermint patties are a popular and refreshing treat that has been enjoyed by many for decades. These delicious candies consist of a smooth, creamy peppermint-filled center, coated with a layer of smooth dark chocolate. The combination of cool mint and rich chocolate makes for a delightful and satisfying flavor experience.
Traditionally, peppermint patties were produced by various confectionery companies and sold in stores. However, today, many people are opting to make these delectable candies at home. Not only is it a fun and rewarding activity, but it also allows you to customize the recipe to suit your taste preferences.

The Homemade Peppermint Patties Recipe
Making homemade peppermint patties is surprisingly simple and requires just a few ingredients. Here’s a straightforward recipe to help you get started:
Ingredients:
- 2 cups powdered sugar
- 1 1/2 tablespoons softened butter
- 2 teaspoons peppermint extract
- 2 tablespoons evaporated milk
- 9 ounces dark chocolate, melted
Instructions:
- In a mixing bowl, combine the powdered sugar, softened butter, peppermint extract, and evaporated milk. Mix until well combined and the mixture forms a dough-like consistency.
- Roll the dough into small balls, about 1 inch in diameter, and place them on a parchment-lined baking sheet.
- Flatten the balls slightly with the palm of your hand to create a patty shape.
- Place the baking sheet in the freezer for about 15 minutes to firm up the patties.
- In the meantime, melt the dark chocolate in a microwave-safe bowl or using a double boiler.
- Take the patties out of the freezer and dip each one into the melted chocolate, ensuring they are fully coated.
- Place the coated patties back on the parchment-lined baking sheet and let them set.
Once the chocolate has hardened, your homemade peppermint patties are ready to be enjoyed! Store them in an airtight container at room temperature for up to two weeks.
Best Tips for Homemade Peppermint Patties
- Make sure the butter is softened but not melted, as this will help achieve the right texture for the dough.
- Use a good quality dark chocolate for the coating to enhance the overall flavor.
- If desired, you can add a drop of food coloring to the dough to give your patties a festive look.
- For an extra touch, sprinkle crushed candy cane or peppermint candy on top of the melted chocolate before it sets.
By making your own peppermint patties, you can enjoy the satisfaction of creating a classic treat from scratch. Whether you indulge in them yourself or share them with friends and family, these homemade candies are sure to impress. Happy candy making!
Alternative Ingredient Options
While the traditional recipe calls for specific ingredients, there are some substitutions and variations you can consider to customize your homemade peppermint patties:
- Sugar alternatives: If you prefer a healthier option, you can use powdered erythritol or another powdered sugar substitute in place of conventional powdered sugar.
- Dairy-free and vegan options: For those avoiding dairy, you can substitute the softened butter with coconut oil or a dairy-free margarine. Additionally, use dairy-free dark chocolate for the coating.
- Flavor variations: If you want to experiment with different flavors, you can try using other extracts instead of peppermint, such as almond or orange extract. This will give your peppermint patties a unique twist.
Remember, while these alternative options can offer variety, it’s essential to properly adjust the quantities and ratios to maintain the desired consistency and taste. Enjoy exploring different combinations and finding the perfect homemade peppermint patty recipe that suits your preferences.
By using this simple recipe and considering alternative ingredients, you can create your own batch of delightful homemade peppermint patties. Whether you’re making them for a special occasion or simply treating yourself, the process is straightforward and accessible to everyone. So, grab the ingredients, get creative, and enjoy the satisfaction of making your own delicious peppermint patties!
Shaping and Chilling
Methods for shaping the peppermint filling
Once you have successfully made the peppermint filling for your homemade peppermint patties, it’s time to shape it into the desired form. There are a few methods you can use to shape the filling, depending on your preference and the tools available.
- Using a round cookie cutter: Roll out the chilled filling on a clean surface lightly dusted with powdered sugar. Use a round cookie cutter to cut out circles of the desired size. This method ensures uniformity in shape and size.
- Hand-shaping: Take a small portion of the chilled filling and roll it between your palms to form a ball. Flatten the ball slightly to create the patty shape. This method gives a rustic, homemade look to the patties.
- Using a mold: If you have a peppermint patty mold, lightly grease it with cooking spray and press the chilled filling into the mold. Carefully remove the shaped filling from the mold to preserve the intricate details.
Choose the method that suits your preference and the occasion. Regardless of the shaping method, make sure to handle the filling with care to maintain its texture and avoid any cracks or deformities.
Importance of chilling the patties before coating
Chilling the shaped peppermint patties before coating them is a crucial step in achieving the perfect finished product. Here’s why it’s important to refrigerate the patties before moving on to the next step:
- Firming up the filling: Chilling the patties allows the filling to firm up, making it easier to handle and coat. It helps the patties maintain their shape and prevents them from losing their form during the coating process.
- Preventing melting: Peppermint patties have a tendency to melt quickly at room temperature. By chilling them before coating, you reduce the risk of the filling melting and losing its distinct shape.
- Enhancing flavor and texture: Cooling the patties allows the flavors to meld together and develop a more pronounced minty taste. It also gives the filling a smoother and creamier texture, enhancing the overall experience when biting into a homemade peppermint patty.
Remember to refrigerate the shaped patties for at least 30 minutes before proceeding to the next step of coating them with chocolate. This ensures that your homemade peppermint patties turn out visually appealing, delicious, and enjoyable to eat.
By using the appropriate shaping method and chilling the patties before coating, you are on your way to creating delectable homemade peppermint patties that will impress your family, friends, or customers. The shaping and chilling stages are important preparation steps for the final delicious treat that awaits.
Chocolate Coating
Types of chocolate suitable for coating peppermint patties
When it comes to coating your homemade peppermint patties, choosing the right type of chocolate is crucial. Here are a few options that work well for achieving that smooth, glossy finish:
- Semi-Sweet Chocolate: This is a classic choice for coating peppermint patties. It has a rich, balanced flavor that complements the minty filling perfectly. Make sure to use a high-quality brand for the best results.
- Bittersweet Chocolate: For those who prefer a slightly more intense chocolate flavor, bittersweet chocolate is an excellent choice. It has a higher percentage of cocoa solids, adding depth and complexity to your peppermint patties.
- Dark Chocolate: If you’re a fan of intense, deep flavors, opt for dark chocolate. It has a higher cocoa content than both semi-sweet and bittersweet chocolate, resulting in a more robust taste. Dark chocolate pairs exceptionally well with the refreshing peppermint filling.
- White Chocolate: While not technically chocolate, white chocolate can be used to create a visually stunning contrast against the dark green peppermint filling. It has a creamy, sweet flavor that complements the minty center.
Techniques for melting and tempering chocolate
To achieve that coveted smooth and shiny chocolate coating, it’s essential to melt and temper the chocolate properly. Here are some techniques you can use:
- Double Boiler Method: This method involves melting the chocolate in a heatproof bowl set over a saucepan of simmering water. Stir the chocolate occasionally until it melts completely. Be cautious not to let any water come in contact with the chocolate, as it can cause it to seize.
- Microwave Method: Break the chocolate into small pieces and place them in a microwave-safe bowl. Heat the chocolate in short intervals, stirring well after each interval until smooth. Be careful not to overheat the chocolate, as it can scorch and become unusable.
- Tempering Method: Tempering is essential for achieving a shiny, professional-looking coating. It involves carefully heating and cooling the chocolate to stabilize its cocoa butter crystals. This process ensures that the chocolate sets firmly and has a smooth texture.
By choosing the right type of chocolate and using the proper melting and tempering techniques, you can elevate your homemade peppermint patties to a whole new level. The velvety, chocolaty exterior will perfectly complement the refreshing and minty filling, creating a delightful treat that will impress anyone who tries it.
Now that you know the secrets to a flawless chocolate coating, get ready to indulge in the heavenly combination of smooth chocolate and refreshing peppermint in each bite. Your homemade peppermint patties will be the star of any gathering or gift box, showcasing your skills as a master chocolatier.
Coating the Peppermint Patties
Process for dipping the peppermint patties in chocolate
Once you have prepared the irresistible peppermint filling and shaped it into delightful patties, it’s time to give them that finishing touch with a decadent chocolate coating. Follow these steps to achieve a flawless chocolate coating that will make your homemade peppermint patties truly exceptional.
- Prepare the chocolate: Melt your chosen type of chocolate using your preferred method. Whether you opt for semi-sweet, bittersweet, dark, or white chocolate, make sure it is smooth and completely melted before moving on to the next step.
- Dip the patties: Using a fork or dipping tool, carefully place one peppermint patty into the melted chocolate, ensuring it is fully coated. Gently tap the fork or tool on the side of the bowl to remove any excess chocolate.
- Place on a parchment-lined baking sheet: Transfer the coated peppermint patty onto a baking sheet lined with parchment paper. Repeat this process for all the remaining patties, leaving enough space between each one to prevent them from sticking together.
- Allow the chocolate to set: Place the baking sheet in the refrigerator for about 10-15 minutes or until the chocolate coating has hardened. This will ensure that the chocolate sets properly and creates a smooth, glossy finish.
Decorative drizzling or topping options
To add a visually stunning element to your homemade peppermint patties, consider adding decorative drizzles or toppings on the chocolate coating. Here are a few options to inspire your creativity:
- White chocolate drizzle: Once the initial chocolate coating has set, melt some white chocolate and transfer it into a piping bag or a small ziplock bag. Snip a tiny corner of the bag and drizzle the melted white chocolate over the peppermint patties in a zig-zag or swirl pattern.
- Sprinkles: Sprinkle colorful or seasonal themed sprinkles onto the freshly dipped peppermint patties before the chocolate coating sets completely. This will not only add a delightful texture but also bring a festive touch to your treats.
- Crushed candy canes: Crush some candy canes into fine pieces and sprinkle them over the wet chocolate coating. The combination of the minty candy cane pieces and the smooth chocolate will create an irresistible flavor and a beautiful appearance.
Let your imagination run wild and experiment with different drizzling techniques and toppings to create unique and visually appealing homemade peppermint patties. The decorative touches will not only enhance their appearance but also make them even more enticing.
Now that your peppermint patties are coated in a luxurious layer of chocolate and beautifully decorated, they are ready to be enjoyed. These delectable treats can be savored yourself or gifted to family, friends, or colleagues. The combination of the refreshing minty filling and the velvety chocolate coating will leave everyone wanting more.
With this recipe and the tips provided, you can now confidently create homemade peppermint patties that rival those found in upscale chocolatiers. Happy dipping and decorating!
Variations and Additions
Creative options for personalizing homemade peppermint patties
- Flavored fillings: While the classic peppermint filling is undeniably delicious, why not experiment with different flavors? Add a twist by incorporating extracts such as vanilla, almond, or raspberry into the filling mixture. This simple addition can bring a whole new dimension to your homemade peppermint patties.
- Cookie crumbles: For an added crunch, consider mixing crushed cookies into the peppermint filling. Whether it’s chocolate sandwich cookies or your favorite shortbread cookies, the combination of the smooth filling and the textured cookie pieces will create a delightful contrast.
- Liquor-infused: For adult-only versions, you can infuse your peppermint patties with a touch of your favorite spirit. From rum to bourbon, a small amount of liquor can add depth and complexity to the flavor profile. Just remember to consume responsibly and label them appropriately.
- Custom shapes: While the traditional round shape is iconic, why not have fun with different shapes and sizes? Invest in various molds or use cookie cutters to create unique shapes for your peppermint patties. This personalized touch will make them even more appealing.
- Gourmet toppings: Elevate your peppermint patties by adding gourmet toppings. Consider topping them with a sprinkle of sea salt, finely chopped nuts, or edible gold flakes for a touch of elegance. These carefully chosen additions will give your treats a sophisticated twist.
- Colored coatings: Get creative with your chocolate coatings by adding food coloring to achieve vibrant and eye-catching hues. Whether it’s pastel colors for a springtime treat or bold shades for special occasions, colored coatings are a fantastic way to personalize your peppermint patties.
Remember to experiment and have fun with your variations and additions. Homemade peppermint patties offer endless possibilities for customization, allowing you to create a truly unique treat that will impress your family, friends, or even customers if you decide to share them. So, get creative, let your imagination run wild, and enjoy the delicious results of your homemade peppermint patty creations!
Other Similar Recipes
If you like this homemade peppermint patties recipe, here are some other recipes you might like:
- Lemon Curd Cookies
- Birthday Cake Oreo Crumbl Cookie
- Chocolate Marshmallow Cookies
- Chocolate Chip Marshmallow Cookies
- Pumpkin Cheesecake Cookies
- Strawberry Cheesecake Cookies
FAQ About Homemade Peppermint Patties
If you’re a fan of the classic peppermint patties or looking to try your hand at making them at home, you may have some questions. Here are the answers to frequently asked questions about homemade peppermint patties:
How do I make the peppermint filling?
To make the peppermint filling, you’ll need powdered sugar, softened butter, peppermint extract, and a touch of milk. Start by creaming the butter until smooth, then gradually add in the powdered sugar and peppermint extract. Add a small amount of milk as needed to achieve a smooth and pliable consistency.
How do I shape the peppermint patties?
Once you have the peppermint filling, you can shape it into small round patties. Use your hands to roll the filling into balls, then flatten them gently to create the desired shape. Alternatively, you can use a round cookie cutter or a peppermint patty mold to achieve a uniform shape.
Can I use dark or white chocolate instead of milk chocolate?
Absolutely! While milk chocolate is the classic choice for coating peppermint patties, you can experiment with different types of chocolate. Dark chocolate adds a rich and intense flavor, while white chocolate provides a creamy and sweet contrast. Feel free to personalize your peppermint patties with your favorite chocolate.
How long do homemade peppermint patties stay fresh?
Homemade peppermint patties can be stored in an airtight container at room temperature for up to two weeks. If you want to extend their shelf life, you can refrigerate them for up to a month or freeze them for even longer. Just be sure to thaw them before serving.
Can I add other flavors to the filling?
Absolutely! While peppermint is the classic flavor, you can get creative and add other extracts to the filling mixture. Try experimenting with almond extract, vanilla extract, or even raspberry extract to bring new dimensions of flavor to your homemade peppermint patties.
Now that you have the answers to some common questions about homemade peppermint patties, you’re ready to embark on your delicious baking adventure. Have fun experimenting with flavors, shapes, and coatings to create your own unique twist on this timeless treat.
Homemade Peppermint Patties
INGREDIENTS
- 2 cups powdered sugar
- 1 1/2 tablespoons softened butter
- 2 teaspoons peppermint extract
- 2 tablespoons evaporated milk
- 9 ounces dark chocolate melted
INSTRUCTIONS
- In a mixing bowl, combine the powdered sugar, softened butter, peppermint extract, and evaporated milk. Mix until well combined and the mixture forms a dough-like consistency.
- Roll the dough into small balls, about 1 inch in diameter, and place them on a parchment-lined baking sheet.
- Flatten the balls slightly with the palm of your hand to create a patty shape.
- Place the baking sheet in the freezer for about 15 minutes to firm up the patties.
- In the meantime, melt the dark chocolate in a microwave-safe bowl or using a double boiler.
- Take the patties out of the freezer and dip each one into the melted chocolate, ensuring they are fully coated.
- Place the coated patties back on the parchment-lined baking sheet and let them set.


